Posts tagged #tutorial

Create a UIButton in Code with Objective-C

iPhone Button tutorial for Xcode

Create a UIButton Programmatically

When you need more control over the user interface buttons and layout you will need to learn how to create a UIButton in code. Creating a button in code enables dynamic button creation, where you can create buttons in response to panels sliding or context sensitive dialog messages. Understanding code allows you to create interactive and playful interfaces. 

Creating your first button in code can be challenging, you might find yourself in a situation where you don’t see your button. This is a common mistake for developers who are new to the way iOS works with and objects. 

There are 5 important steps that you need to follow when adding any kind of UIView, UIButton, or UILabel programmatically. If you do each of these steps, you will understand how to add any kind of user interface (UI) element to your app.

  1. Create a using the class method buttonWithType:
  2. You need to set text for the button for the current UIControlState.
  3. You need to set the size of the button. 
  4. You need to specify button’s position.
  5. You need to add the button to a visible parent view (i.e. self.view).

If you miss any of these steps, you’ll be staring at a blank screen. You won’t be able to see or touch your button.

Step 1: Create your First iOS 7 UIButton in Code

You can create your first iOS 7 button in code, it will look like the default iOS 7 text buttons using the standard tint color. Open the ViewController.m file and look for the viewDidLoad: method. Add the bold code below to create a button inside the curly braces.

- (void)viewDidLoad {
    [super viewDidLoad];

    UIButton *button = [UIButton buttonWithType:UIButtonTypeSystem];
    [button setTitle:@"Press Me" forState:UIControlStateNormal];
    [button sizeToFit];
    [self.view addSubview:button];
} 
The default position of a button in code is the top left corner.

The default position of a button in code is the top left corner.

Run the app, and tap the button. 

Did you notice the “Press Me” button is behind the status bar in the top left corner. Sometimes you can’t click the button because it’s behind the status bar. You can fix the bug by setting the center position.

Step 2: Set the Button's Center Position

You can set the center to a new (X, Y) point using the CGPointMake() function. On an iPhone 5 screen your display is 320 points wide and 536 points tall. To get the center X coordinate, divide 320 by 2. Next, use a positive Y value to shift the button downward, you can use 60.

- (void)viewDidLoad {
    [super viewDidLoad];

    UIButton *button = [UIButton buttonWithType:UIButtonTypeSystem];
    [button setTitle:@"Press Me" forState:UIControlStateNormal];
    [button sizeToFit];

    // Set a new (x,y) point for the button's center
    button.center = CGPointMake(320/2, 60);

    [self.view addSubview:button];
} 
Change the center position to move the button around your iPhone app.

Change the center position to move the button around your iPhone app.

Step 3: Add an action to the button

The button won’t do anything when you tap on it, until you add an action. Define a new method that can be called when the button is tapped. Add it below the viewDidLoad method.

- (void)buttonPressed:(UIButton *)button {
     NSLog(@"Button Pressed");
}

The method buttonPressed: will be called when the button is touched. To be specific it’s a touch inside the bounds of the button. Button presses can be canceled when you drag your finger outside the boundaries of a button, instead of lifting up inside the button. 

To test if it’s working add an NSLog() print statement to show a message on the Console.

You will add a Target/Action pair to the button to give it access to the code file that defines the method and behavior that you want to happen with a button tap. Use the @selector keyword to tell the button the name of the method, including the colon.

- (void)viewDidLoad {
    [super viewDidLoad];

    UIButton *button = [UIButton buttonWithType:UIButtonTypeSystem];
    [button setTitle:@"Press Me" forState:UIControlStateNormal];
    [button sizeToFit];
    button.center = CGPointMake(320/2, 60);

    // Add an action in current code file (i.e. target)
    [button addTarget:self action:@selector(buttonPressed:)
     forControlEvents:UIControlEventTouchUpInside];

    [self.view addSubview:button];
} 

Run the app and tap the button. Now you will see the message in the text Console on the bottom half of Xcode’s window.

The NSLog() function displays text in the Console panel in Xcode.

The NSLog() function displays text in the Console panel in Xcode.

More iPhone Button Customization

You can change the font, text color, and background images for any button on iOS. If you want to learn more, sign up for the iPhone mailing list.

 
Subscribe and you will get FREE access to a 5 video course on custom buttons for iOS.

Subscribe and you will get FREE access to a 5 video course on custom buttons for iOS.


Posted on August 5, 2014 and filed under Programming .

Objective-C Syntax Highlighting with Squarespace 6 using SyntaxHighlighter without Developer Mode

Syntax Highlight for Objective-C on Squarespace 6

Update 6/19/14: This method works for Safari, but it keeps failing in Chrome. I've disabled it for now until I can investigate a better option. The code and method should still work, but the comparisons won't look different below.

I write a lot of code samples and I was using SyntaxHighlighter on my wordpress blog, but since I started using Squarespace I didn't have an easy solution to get it working. I spent the day digging around the internet and found some guides on how to get it to work without the Developer Mode on Squarespace. 

Syntax highlighting is useful because it makes it easier to digest what the different parts of a blog post are. You can easily separate the content from the code because of the coloring. I'll show a comparison with pros/cons and then you can jump to the guide to setup your Squarespace blog.

Code Sample Comparison for Squarespace Blogs

Code Paragraph Style

Here is a code sample without syntax highlighting using the "Code" paragraph style for the monospace font. It's rather buggy to get right in Squarespace 6. You copy paste into Squarespace and the formatting will be off (I have to delete every other newline (return)). Then I have to apply the "Code" tag and reformat again. It's super picky and if you modify the text too much you may have to reformat it.

Pros:

  1. Works out of the box
  2. Don't need to escape "<" characters with <

Cons

  1. Spacing is buggy
  2. Lots of text formatting
  3. Deleting text lines near, in, or around the Code paragraph style can alter the formatting


#import "ViewController.h"
@interface ViewController () <UIGestureRecognizerDelegate> {
CGFloat _centerX;
}
@end

@implementation ViewController
- (void)viewDidLoad {
[super viewDidLoad];

UIScreenEdgePanGestureRecognizer *leftEdgeGesture = [[UIScreenEdgePanGestureRecognizer alloc] initWithTarget:self action:@selector(handleLeftEdgeGesture:)];
leftEdgeGesture.edges = UIRectEdgeLeft;
leftEdgeGesture.delegate = self;
[self.view addGestureRecognizer:leftEdgeGesture];

// Store the center, so we can animate back to it after a slide
_centerX = self.view.bounds.size.width / 2;
}
@end

As you can see it becomes hard to read and really see the code. There is no syntax highlighting and controlling the spacing is manual. I'd have to manually fix each line to get it to indent properly, instead of defaulting to my copy/paste from my code editor.

SyntaxHighlighter Code Highlighting

Here is the same code sample with SyntaxHighlighter. Instead of doing a Text block, I use a Code block with HTML. To learn how to set it up, keep on reading below.

I'll use the

 installation method so that the code is inline with the blog, as opposed to the script method. The script method doesn't work well with RSS readers. Note: If you want your code indexed by Google, you'll want to use 

 to rank higher in search for the code.
                          

Pros

  1. Multiple programming languages supported via brushes.
  2. Respects code formatting/spacing

Cons

  1. Need to escape the < "less-than" characters as < (Find and replace all in the code block)
#import "ViewController.h"

@interface ViewController ()  {
    CGFloat _centerX;
}
@end
@implementation ViewController
- (void)viewDidLoad {
    [super viewDidLoad];
    
    UIScreenEdgePanGestureRecognizer *leftEdgeGesture = [[UIScreenEdgePanGestureRecognizer alloc] initWithTarget:self action:@selector(handleLeftEdgeGesture:)];
    leftEdgeGesture.edges = UIRectEdgeLeft;
    leftEdgeGesture.delegate = self;
    [self.view addGestureRecognizer:leftEdgeGesture];
    
    // Store the center, so we can animate back to it after a slide
    _centerX = self.view.bounds.size.width / 2;
}
@end

SyntaxHighlighter Makes Code Readable on your Blog

Now that you've seen the comparison, let's jump right in and set you up with SyntaxHighlighter on Squarespace 6. You don't need to upload files or enable developer mode to make it work. Instead we can link to already public javascript and css files.

1. Go to your Squarespace Settings Tab > Code Injection > Header

Settings > Code Injection > Header to add custom code to all pages hosted on  your Squarespace domain.

Settings > Code Injection > Header to add custom code to all pages hosted on  your Squarespace domain.

2. Add the following code to get syntax highlighting working for Objective-C, CSS, and javascript. I code in Objective-C, but I needed Javascript and CSS to show the code for this post.


3. Add a Code block for HTML code, and disable "Display Source". You'll have to hover the mouse on the left side of your "Edit Post" popup window with Squarespace 6. You'll see a "+" to add a new block.

Add a new block by hovering your mouse on the left side of Squarespace

Add a new block by hovering your mouse on the left side of Squarespace

4.  Scroll down in the popup until you find "Code" under the "More" section. Click it to add it. Or you can drag it to a specific position in the layout of your blog post on Squarespace 6.

Scroll down and look for the Code block under the More category.

Scroll down and look for the Code block under the More category.

5. Turn off the "Display Source" option and use the HTML code to have the code work properly.

Add your source code and make sure to replace any "<" characters with the < escape code for proper HTML formatting. If you don't, your source code won't render correctly and you'll see strange things on your blog page.

Disable the "Display Source" and make sure you are on HTML code. All < characters should be replaced with <

Disable the "Display Source" and make sure you are on HTML code. All < characters should be replaced with <

6. Add some sample code to display with syntax highlighting.

Sample code (Copy/Paste to your code block)

#import "ViewController.h"

@interface ViewController () {
    int _x;
}

@end

Output of Sample Code

#import "ViewController.h"

@interface ViewController () {
    int _x;
}

@end

Gotchas:

Code is Editable on Double-Click

The code uses a property to make it easy to copy/paste the full code block. If you want to disable this behavior you can add the code to disable quick-code. If you click off of the text area, it'll jump back to the code. It's a little annoying, but it can make it easier for your readers to copy/paste code from your website to their IDE.

#import "ViewController.h"

@interface ViewController () {
    int _x;
}

@end


How do I Remove Line Numbers?

Set the gutter to false after you set the brush. Include a ; (semicolon) to separate multiple arguments.

Source

#import "ViewController.h"

@interface ViewController () {
    int _x;
}

@end

Output

#import "ViewController.h"

@interface ViewController () {
    int _x;
}

@end

Xcode Copy and Paste Issue with Non-breaking Space Characters -  

Using the default script that I have linked has a bug where when you double click and copy, the code inserts non-breaking space character codes.   or  

To fix this, make sure in the code you placed under Code Injection in Squarespace's settings that you include an explicit white space character for your spaces. You can set this to any character you'd like. Normal spaces will fix the copy/paste issues.


SyntaxHighlighter Can't find brush for: js (etc)

Can't find brush for: js - We didn't uncomment or add the correct language brush for SyntaxHighlighter

Can't find brush for: js - We didn't uncomment or add the correct language brush for SyntaxHighlighter

You'll need to include a new script for each language that you want to support code formatting. I would only include the ones that you need.

You'll get this error dialog when a user loads the page and the brush type isn't supported. (Or if the source file original links you've used no longer exist)

Resources

Let me know if this post was helpful. I spent a lot of time trying to research it and figure out solutions to some of the common problems. You can take a look at the resources that I found helpful.

Connect

  1. Join my iPhone mailing list to keep learning about making iPhone apps.
  2. For more structured learning, signup for my online iPhone app course.
Posted on March 25, 2014 and filed under Programming, Tips .

Play a YouTube Video URL from your iPhone App on iOS 7

Brewing coffee with Chemex and freshly roasted beans

Brewing coffee with Chemex and freshly roasted beans

Update 4/28/14: Pavel suggested checking out .

I'm working on an update for my app . In the process of updating it for iOS 7.0, I wanted to display a video to show a demo on how to use the app. I thought that I could take advantage of the to play/pause the movie within my app, but it doesn't work with YouTube links (i.e. Coffee brewing with Chemex ).

YouTube doesn't give direct links to the movie files, instead it's a proxy webpage. You need to use the official HTML YouTube player to play a YouTube video on a mobile device. It's also against the terms of service to play the movie file directly. The work around is to use a UIWebView and HTML code to display the video. I don't like this approach because it feels unresponsive and requires a lot of code. You can see example code on StackOverflow, but you might have to massage it to get it working. It does keep the user inside the app, but I feel that the experience is worse than opening up the video in Safari or the YouTube app.

The easiest way to play a video from YouTube (or any other website) is to write a single line of code. If you copy/paste the YouTube video link into an NSString literal, you can create the URL and open it.

[[UIApplication sharedApplication] openURL:[NSURL URLWithString:@"http://www.youtube.com/watch?v=Jeh40KFFS5Y"]];

The Bigger Picture - App Tutorials

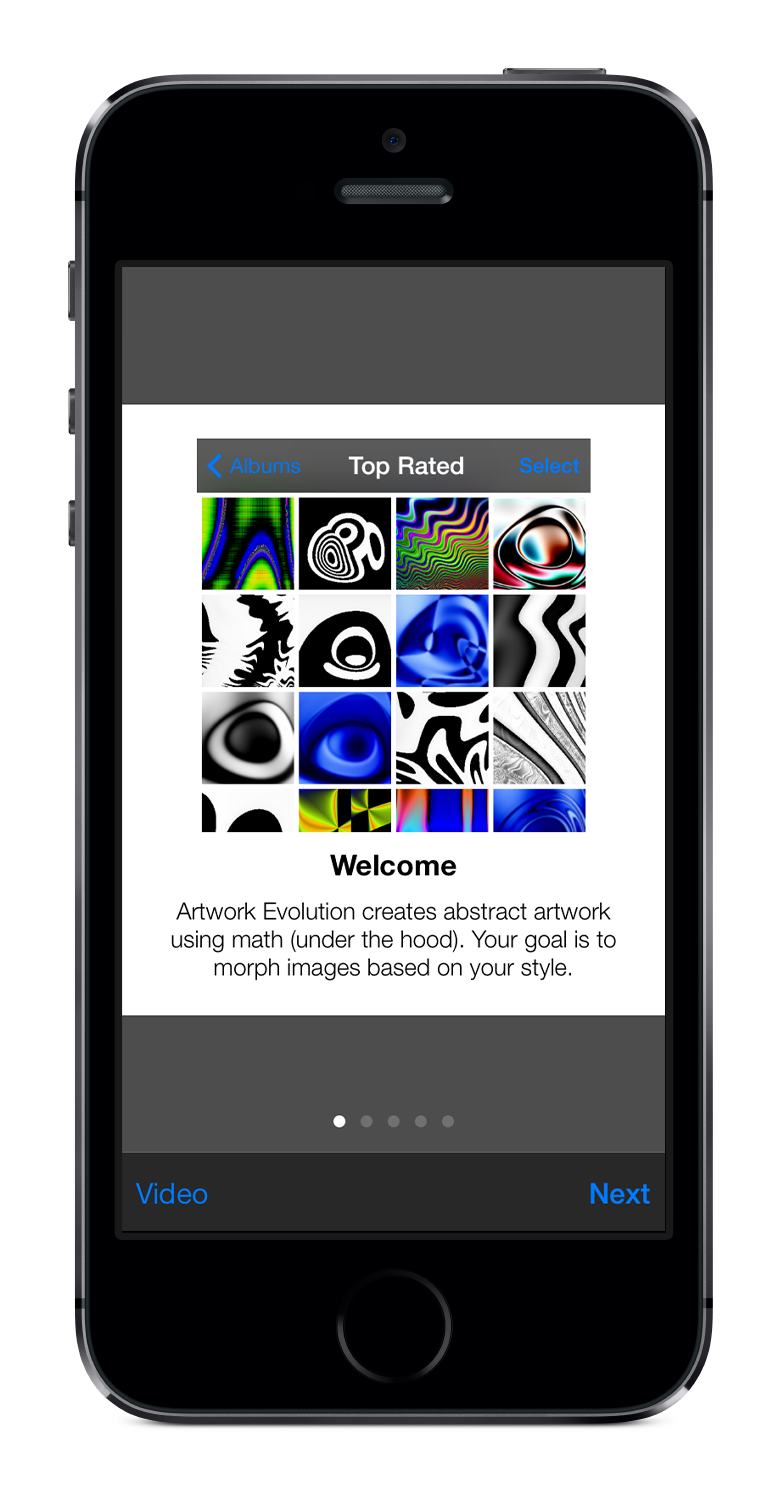
In , I'm designing a paging view controller (PagingViewController) that uses the UICollectionView and Auto Layout to display image and text content. Along the bottom I have a button to play a video tutorial and the Next button. When the user reaches the end of the tutorial, the next button becomes a Done button, and the tutorial screen can be removed from the screen.

Tutorial screens for Artwork Evolution with video playback

Tutorial screens for Artwork Evolution with video playback

I display the tutorial screen when the app is first opened. When you launch a new version of the app, you can update the tutorial content and video link to feature the new content or functionality. 

Posted on March 3, 2014 and filed under Programming .